Showing posts with label DIY. Show all posts

Sunday, October 2, 2016

How to -Pumpkin Apple Spice Muffins

October is here and have I got an easy, DEELISH, healthy recipe for you. 
This is one of my son's fave muffins I've changed the original recipe up and replaced it with a few of my personal fave items to bake with. I guarantee not only the taste but the smell is absolutley unforgettable. 
Lets get started:
2 1/2 Cups All Purpose Flour
2 Cups Coconut Sugar
1 Tablespoon Pumpkin pie spice
1 teaspoon baking soda
1/2 teaspoon salt
2 eggs, lightly beaten
1 cup canned pumpkin puree
1/2 cup Olive Oil
2 cups peeled cored and chopped apples

Streusel Topping
2 Table Spoon APF + 1 Tablespoon Oatmeal
1/4 cup Coconut sugar
1/2 teaspoon ground cinnamon
2 teaspoon butter

First set your oven at 170 degrees C then get your spices ready to make your very own Pumpkin Pie spice. If you have your own pre-made bottle then obviously you can skip this part. I love to make my own as it is super dooper easy. My son loves to make this for the recipe. I had every spice in powdered form except for the cloves so I zapped that up in my spice blender to complete my mix. 
When you make this mix the aroma is AMAZING!!! Your entire house will smell like thanksgiving:)
This recipe is from Better Crocker and it is a great recipe. I use it for my pumpkin pie too. You can save this in a jar and use it for other recipes. 
Chop your apples. 
In a separate bowl put the following ingredients:
2 1/2 Cups APF
1 Tablespoon Your Pumpkin pie spice:)
1 teaspoon baking soda
1/2 teaspoon salt
 In another bowl  mix your wet ingredients + Coconut sugar
2 x eggs lighly beaten
1 cup canned pumpkin puree
1/2 cup Olive Oil
2 cups coconut sugar
I love coconut sugar it gives just the right amount of sweetness without the after bite of sugar. Its unrefined which is great for all you healthy peeps out there and great sweet fix for the kids.
After your pumpkin puree is well blended add in your dry ingredients
fold in your beautiful chopped apples
coat your muffin tins with cake release. 
The name of this says it all. I've used this for 13 years and it has never failed me. 
My cakes have never stuck to my pans. 
Fill your pans appx 3/4 full. I always make mini muffins for my sons snack. But usually I finish up the mini ones before anyone else.  Also to give the muffins an extra yummy factor I topped it with strussel topping. Hmmmm Hmmm amazing. This part you really shoudn't pass up. It takes your muffins to a whole other level of yummy-ness! Mix all these ingredients together to resemble a crumbly texture and then sprinkle on top of your muffins. 
Streusel Topping
2 Table Spoon APF + 1 Tablespoon Oatmeal
1/4 cup Coconut sugar
1/2 teaspoon ground cinnamon
2 teaspoon butter
Bake for appx 25-35mins. make sure your toothpick is clean after inserting into the muffin.
Your house in the meantime will smell GLORIOUS! You need to bake these honestly just for the aromatic experience. Its HEAVENLY!!!
TAH DAH!!!!!
And this is how everyone will feel about your muffins!!! 
HELLO FALL! We luv you!
Enjoy!

Tuesday, November 10, 2015

How to make Cake Pops in 2 minutes!

Lets make treats! Enjoy this video we made to show you how to make 3 cake pop designs in 2 minutes.
xoxo
j

And here's an oldie but goodie. This video shows you in detail how to melt your candy melts!
Enjoy


Thursday, April 24, 2014

Whooo Whoo Owl Buttercream transfer technique:)

This Buttercream transfer technique opens up a world of decorating ideas. 
It makes decorating specific themes, characters etc a whole lot easier. 
All you need is: 
-Piping Bags, Tips #3, #2, #1 depending on how fine you need to pipe the details you can adjust the tip.
-xerox copy of the image you want to have on your cake.
note: make your image the exact size you want to have on your cake
- reverse the image if it is a face such as thomas the tank or doing some kind of action. so by the time you flip your buttercream transfer over, it will be facing the right way.

-Buttercream in all the colors you want to put onto your transfer
 And if you don't have time to make different colors, you can also use  Wilton ready to use buttercream in individual colors. That'll save you heaps of time.

Tape your image onto your cake board and then tape a piece of wax paper over it. 
Then pipe away:)
I like to do the outline first and then all the lil eensy weensy details such as polka dots and the little twinkle on the eyes. 
Slowy go over each section layer by layer
Tip: If you find your buttercream smears when piping other colors, put your image into the freezer for about a minute to set it slightly hard. Then when you pipe over it you will not smear any of the colors and get a very clean finish.
 After piping, place your transfer into the freezer for about 5-10 minutes
once you take it out, flip it and slowly peel off the wax paper. 
Tah Dah!!! 
yes, its that easy:)
You may place your transfer on your cake immediately. If you are not going to use it right away, place it into the freezer in an airtight container until you need it. 
Remember you can use the transfer on just about any cake. 
Fondant, Buttercream or Whipped cream. 
It's absolutly amazing.
Give it a go, it'll be life changing.

Sunday, January 12, 2014

Flower Power: Dusting Gumpaste Flowers

Quite often people ask us  how to use petal dust on Gumpaste flowers. So I thought I"d share a quick and easy method on how to add some Power to your Flower:)
When I first started using petal dust, I was SCARED! Mostly because I was afraid that if I used too much color it would ruin my flower. And that would be terrible because I spent so many hours making the gumpaste flower petal by petal.
After making friends with my petal dust, I realized man this stuff is AWESOME!!! There is no reason why I should be scared.  Like anything I use for the first time, I always say make friends with your tools and new supplies. The more you use it the more comfortable you'll get and the more adventurous you'll be and the more creative and AWESOME your cakes will be. 
So lets get started.

Here are 2 very beautiful Anemones. You may opt to make your own or work with ready made ones. 
Here are some ready made ones that we sell at our shop. They are very pretty, but a bit plain jane. With just a bit of "makeup", your plain jane flowers will be the belle of the ball.
Here 's what you need:
Petal Dust color of your choice: I of coarse chose the shocking pink
Black food marker: Wilton or Americolor
Brush: recommend a flat brush
Open up all your flower petals
dip your brush into petal dust tap a bit off and then apply onto flower stroking from inside out.
easy peesy:) You may continue and add it to the outer large petals as well.
after you have completed that, take your pen and go around the edge of each petal.
next, you may want to steam the flower to set the color onto your flower.
That's it, it's that easy. Your flower went from plain Jane to Badabing-Badaboom!
Get adventurous and try different colors too:)
Have fun and get dusting!!!

Monday, December 30, 2013

Happy New Year & Reindeer Cupcakes!

Hope you all had a splendid Christmas. 
I miss it already wish it was Christmas tomorrow. 
Well I"m having the Christmas blues and in our household, we actually enjoy Christmas treats till Jan 2nd:)
I"ve made these adorable Reindeer cupcakes and dressed them up so they'll fit right in for your
New Years Eve party:) 
Here's what you'll need:
Chocolate Buttercream
Piping gel : Red, White & Black
Gingerbread Boy Sprinkles
Spatula

Step One: Smooth over your cupcake with chocolate buttercream
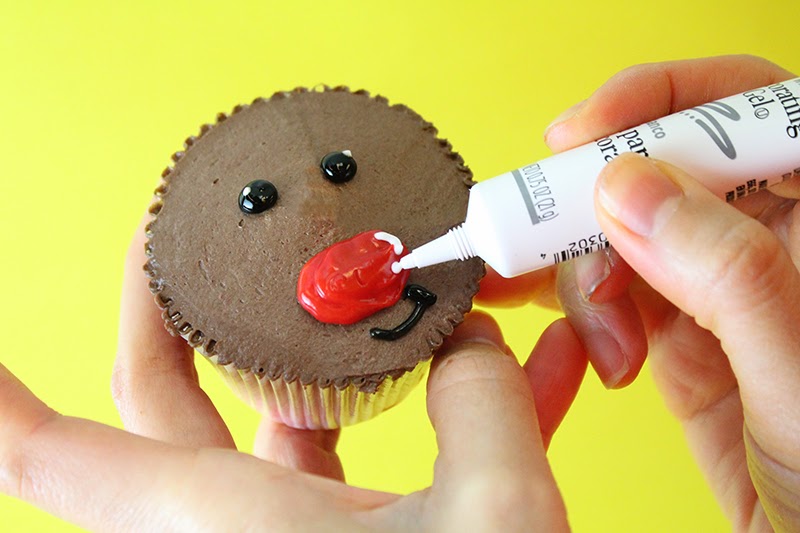
Step 2: Pipe on Rudolph's red nose with red piping gel.
Step 3: Pipe on Rudolph's eyes & smile with black piping gel

Step 4: Add on a lil twinkle on Rudolph's eyes and nose with white piping gel

Step 5: Gingerbread boy sprinkles make the perfect antlers. Simply turn them over and tah dah!!!
SOOOOO CUTE!!! Wait, we gotta dress Rudolph up for our New Years party!!!
Happy 2014 Wooo Hoooo! 
Look forward to seeing you all next year. 
Enjoy, be safe and party like is 2014!!!:)
ps: I personlized these toothpicks by simply printing out 2014 on paper and the gluing them onto toothpicks. 
Easy peezy!!!

Monday, December 16, 2013

How to make Deelite Snowman Cupcake:)

So happy to be sharing a how to step by step with all of you. I know its been a while. 
A definite resolution for me next year. 
I want to share more decorating techniques with all of you through the blog so please do come back often to check it out:)
This snowman cupcake is bound to bring a lot of smiles. 
What we used:
Tips: #3,#2,#12
 Eyes, Cheeks, Smile : Tip #3 (Black, Orange Piping Gel) 
           Quick Method:Use Piping Gel tubes. Snip the tip and its ready to use. 
(CK or Wilton)
Snowman's Beanie Hat: Tip #12 Baby Blue Buttercream
Quick Method: Use CK Baby Blue Buttercream

Nose: Tip #3 orange Piping Gel
Quick method: use fabulous orange chocolate covered sunflower seeds:)
(Choco Rocks by Kimmie Candy)

White Buttercream: face   (CK Buttercream)
Spatula  (Wilton)

Step 1:Smooth over some white buttercream on your cupcake
Step 2:  #12 Tip Pipe Baby Blue icing on the top part of your cupcake making a shape of beanie hat
 Step 3: Smooth over with Spatula
 Step #4: Use  Tip #3 White Buttercream pipe out a zig zag design under the beanie
 Pipe on a lil ball on top of beanie
 Step 5:  Black Buttercream or Piping Gel tub pipe out eyes 
Trust me, its so much easier and saves you heaps of time with a Black piping gel tube.
 Step 6:  Pipe out Orange nose with #3 Tip or
use Orange Chocolate covered sunflower seeds as shown on first image. 
  Step 7:  Black Piping gel and pipe out his handsome smile
 Step 7: He looks so much cuter with cheeks, use pink piping gel to pipe in the cheeks. 
 Tah Dah!!! U did it:)
Now lets get this party started:)
 Happy Holidays:) 10 More days to go eeeeeek!!!!!